
If you have a bit of time and some change in your pocket why not make a cool ring for yourself. I always thought it was illegal to do this type of thing, but it seems that if you don’t intend to use the coin as currency every again it is not illegal.
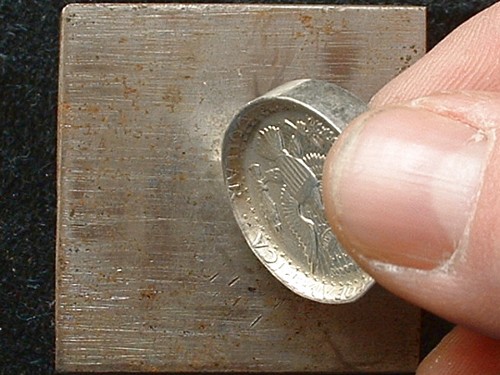
“First you need a piece of steel to use as a base for the coin to set on. Take the coin and stand it on edge. Tap the reeded edge with a spoon or a small machinist hammer while continually rotating the coin, I would recommend using the spoon first until you get the hang of how the silver feels when it folds. Be patient and don’t rush it, it takes a while. ”

Permalink
My dad and I were doing this in the 70’s.
When you do this, look hard for an old quarter, or better yet, an older 50-cent piece that is made of all silver, without the embedded copper. It looks better in the end.
All it takes is patience and a spoon!
Permalink
Yes, you should use a silver coin. I have made 3 myself. A dime, quarter and nickle. all silver. I also used just a spoon turn concaved like this. coin-> -)
Permalink
I tried to do this with a newer copper embedded coin with no luck. Couldn’t even get it to begin to fold, not even with a hammer. There would be no way to do this with just a spoon! I wanted to try this with a cheap coin for practice before ruining a nice silver one. Looks like im going to have to try with a hopefully softer silver coin.
Permalink
I did this with both a copper-mixed and all-silver quarter. With a normal spoon too. It works, you just have to be patient. You don’t really even hit it that hard, just tap, tap, tap.
Permalink
Are you tapping it while its spinning on the drill? How long should this process take? Im using a half dollar which is pertty thick! Have any other tips?
Thanks!
Permalink
Hey,
No, I tap it while rolling it slowly on a table, countertop, coffee table, whatever. Put the ring and a spoon in your pocket and take it with you everywhere you go. You definnitely won’t see results right away. Use a large, heavy “table” spoon to speed things up a bit. It’s been a long time since I’ve done this, but I’d say that it takes 3-5 weeks of tapping in my spare time.
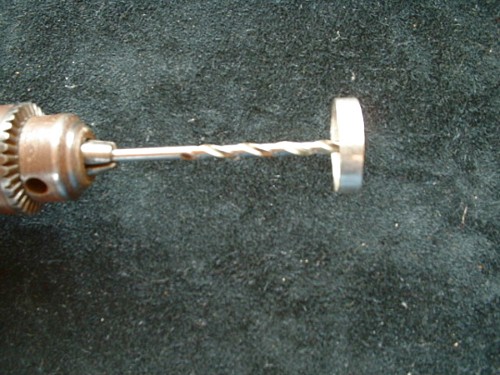
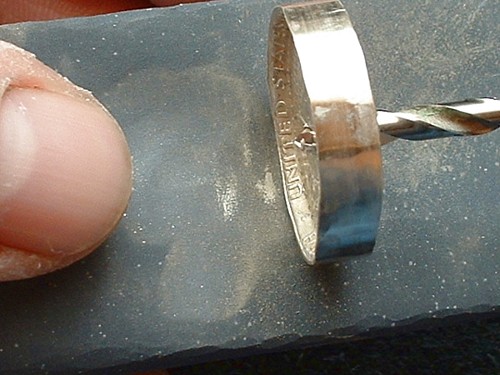
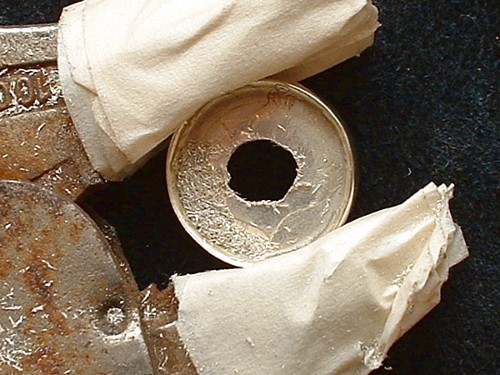
I only drill out the middle when the ring is the right size. In my opinion, drilling is the hardest part, as you gotta get the hole thru the exact center and the ring is hard to hold or clamp while drilling, it wants to squish if you clamp it too hard.
A real silver half-dollar will make a beautiful ring! My sister wears one that is over 30 years old.
Permalink
Using a hammer on the coin makes it a lot easier. I’m using a quarter, and the hammer took about an hour. At first I tried the spoon, but it took WAY to long. The hammer doesn’t change the outcome. The only thing is that it doesn’t look totally smooth…;)
Permalink
I soldered a copper wire to my coin in order to turn it more easily. Since You drill the center out anyway a little blob of solder doesn’t hurt it any =]. Plus, it’s almost impossible to smack your fingers that way.
Permalink
I made one of these when I was in the Air Force back in the late 1950s. Happened upon this site as I was showing my daughter how to do it. I just used the spoon and didn’t drill the center but instead carved it out with a jackknife.
Permalink
Terri Hendrix (terrihendrix.com) has an album/song about her dad doing this.
Permalink
I told my 8 year old son about making a ring out of a coin by just tapping it with a spoon. I did not show him an example or anything, and the next day when I returned home from work he had a 1999 U.S.quarter beat down to about 1/8″ wide and the thing that surprised me the most is he did this while holding it in his hand and not down against anything. He said it took him about 2 hrs. All he has to do know is size it and I will be helping him with that. Since then I too have started to make my own.
Permalink
A coworker of mine has one that was made for her and i became really interested.
I already have a fifty cent piece I just need to track down a
quarter. I don’t want to goof up my only chance to make these so
are there any suggestions? Would I have better luck with a spoon or a
hammer? I need a way that I can do this on the first try for each coin.
Permalink
try it with a not-so-special quarter to get the idea. A quarter will make a much thinner ring than a half dollar. Use a hammer or it will take too long. Can be done in a couple of hours.
Permalink
Is it possible to make one out of a half dollar that has a bit of copper in it?
I began to try it out, and the coin started to become concave in the center. Should I just
toss it or can I fix it?
Permalink
Copper works just fine, just sounds like your not doing it right. you dont beat the coin over, you tap on the very rim and actually squish the coin out on both sides, which is why it takes a lil time. you just hold the coin between two fingers and tap away at the rim, trying to hit square on the rim, rotating between every couple hits. you will have to turn the coin around to keep the right amount of metal flaring out on both sides since its hard to hit perfectly square. bad thing about copper is you will see the copper on one or both edges of the ring will be silver, but its definitely good for practicing before using an expensive coin.
Permalink
Hitting it too hard and/or using a hammer causes the coin to buckle, or become convex like you described. A large table spoon is the way to go. Just tap away and go slow.
Permalink
im sure a large table spoon is the way to go for a high quality ring, im just saying you should at least get a lil practice in with a hammer and a cheap quarter.
Permalink
Thank you Kevo and Ian for your response back I appreciate your help.
Mia
Permalink
Quickly though, how are you guys able to get a hold of these silver
quarters so easily? I have only been able to get my hands on one.
I would like to make a better one with another. Oh and I haven’t drilled
out the center I am a little scared I will mess it up. Any suggestions?
Permalink
theres already been suggestions on drilling out the center, so read above. just realize that drilling out the center is the very last step. you dont do that until its fully beat into a ring.
Permalink
as for the silver coins, try ebay or something
Permalink
How do you know when to stop hitting it with the spoon? The sides have flared out on mine, but it would probably be really thin if I stopped now and drilled it out.
Permalink
Hey, way to go folks. This is cool and a lot of visitors to this site are getting good creative ideas and advice on how to do it. Good job.
Permalink
Brandon, stop tapping it when it looks like it’ll fit your finger. The more you tap it, the wider the ring gets, and the smaller the finger-size gets.
Permalink
Ok so I tapped it a little too much and it only fits my pinky but it fits really loose on my
pinky. would there be a way that I can make it a tad bit bigger?
Mia
Permalink
Oh and how did you guys get yours so smooth?
Permalink
Mia:
you could potentially use some ring sizing tools such as this to stretch it back out and prolly smooth it out a lil.
http://www.harborfreight.com/cpi/ctaf/displayitem.taf?Itemnumber=93522
Permalink
LOL This idea used to be popular in the navy when you are underway… lots of free time no place to go.. I have always used a heavy old spoon and just slighty tap it… for men it is best to ust a silver 50 cent piece and women a quarter.. practice leads to perfect rings… I prefer the tapped look to the smoothed out i like people to ask where I bought it…
Permalink
I have seen these rings made where the writing is on both sides, inside and outside. How do they do that?
Permalink
Keep it up (like I do :-)) Great site – loved the bit about yourselves.
Permalink
Is it possible to make one with a quarter with the copper center and a spoon. I heard that the copper is harder than silver and I want to experiment with a normal quarter so I know what to do when I can get my hands on a siver quarter.
Permalink
Roze,
Yeah, you can make one with a copper/nickel quarter and a spoon. I had one as a kid.
Permalink
If you just can’t get the hang of it, you can buy them online (see link)
Permalink
link: http://forgedunderthemountain.com/
Permalink
I’ve made these for quite some time now. Silver is much easier than the copper/nickel though it can be done with just a spoon. I’ve always removed the center with a sharp pocket knife though a drill and a dremel would be likely quicker and easier. I guess i just take alot of pride in the ones i make. I like the fact i can say they were made with just my hands, a spoon, and a poket knife. Beware that you can annoy everyone around you beating one of these down with a spoon. good luck to all that attempt to make their own. They do get easier after each one you make!
Permalink
Marshall,
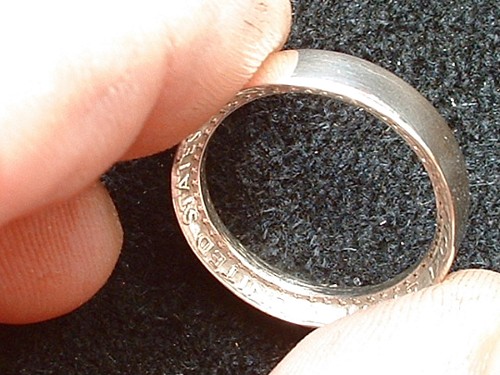
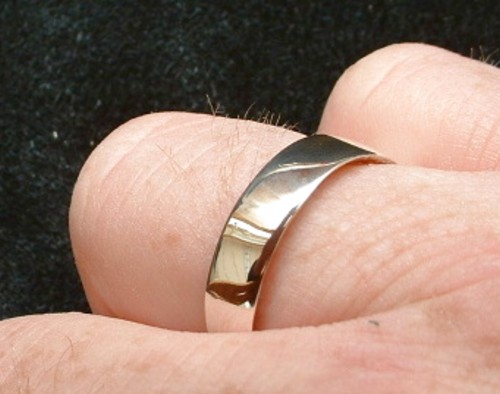
It makes me feel good to know that it gets easier with each one I make, but the first one I made isn’t smooth like the
one in the pictures it looks pretty neat with the texture but how do I smooth one out if I wanted to?
Permalink
To make it smooth: Don’t hurry it up with a hammer, use taps with a spoon. Patience makes a nicer ring.
Permalink
Ian,
Thank you! I did hurry it up with a hammer! I’ll try it…
Permalink
I make them with the inscription on the out side
Permalink
Ron,
How in the world do you make them with the inscription on the outside!!?
That is great if you have any pictures I am definitely interested in seeing them.
Mia
Permalink
To get writing on both sides, you dont have to do any hammering at all. You simply bore a hole in the middle of coin and force the hollow coin over a mandrel and hammer all around the rim of coin until its basically inside out, or the ridge edges turn 90 degrees.
Permalink
I’m making one but what coin should I use if its for a child?
Permalink
You should use a quarter 1964 or older.
Permalink
Ron,
What size whole would you suggest I bore in the middle of the coin?
Permalink
I absolutely love this idea!!!! I tried it yesterday on a new quarter. I started out tapping with a spoon then used a little hammer. When I took a break, I read where oneringtorulethemall suggested to bore a hole in the middle of the coin and force the hollow coin over a mandrel, hammering all around the rim of the coin until it it inside out. I decided to try this. The coin did not turn inside out but when I was finished, I have a ring that is silver on the inside and copper on the outside! It looks pretty neat but that isn’t the ‘look’ I was going for.
The poster didn’t state exactly HOW the coin was forced over the mandrel so my coin got a little ‘out of round’.
I was able to straighten it out and when I finished de-burring it, sanding and polishing, it is now a nice piece of jewelry.
I would like to know from oneringtorulethemall what tool was used to force the coin over the mandrel?
Thanks!!!
Permalink
If you bored a hole in the coin, you then simply place the coin over the mandrel. The mandrel will stick thru the hole in the coin. Its kid of like taking a donut and sticking your finger through the hole. your finger is the mandrel and the coin with hole is the donut. I havent got my coin rings to come out perfect yet, but I am tryinh hard to.
Permalink
Hi,
I understand putting the ring over the mandrel but are you pushing the ring down on it? If so, what are you using to push it with?
I would love to have a ring with the writing on the inside AND outside. How is THAT done?
Thanks
Permalink
Ok, once the ring is on the mandrel you have to hit it with a nylon or rawhide hammer in a downward motion. The ring will start to bend downward. This is the process that does most of the inversion or turning the ring inside out. It wont be perferct and you will only be able to get it about 3/4 inverted on the mandrel. I havent figured out how to get it real nice lookiing like some picures iv seen on internet and get a 100% complete ring shape. I think people are using professional ring stertchers or something to get these type rings to come out. This is a difficult process and i am constantly racking my brain to figure it out. If anyone has any ideas please let me know.
Permalink
http://www.fabric8.com/bazaar/zoom.f8ml?ID=0&PID=LC0101
Check out this site. They must have a machine that makes these rings AND a sizer because you can order your size. Although these rings are really nice and I would love to have one or two, for less than a dollar I can make my own!! lol.
I took my Ben Franklin silver half dollar to work today ( I started hammering on it yesterday). Several of the older guys knew about the coin and spoon thing. I worked on my ring at lunch with a very nice little hammer and it’s coming along well.
My husband gave me a gold-plated, JFK half dollar last night. I have never seen one of those and am curious to see how it will look as a ring.
Permalink
I finally got my quarter dollar ring to come out. I would give myself an A minus becuase it is still slightly crooked. I looked at that website with coin rings. Somebody on ebay is making a killing on these things. Please keep me informed if you get your ring made. I have tried with a half dollar but htey are so thick they are hard to work with.
Permalink
I finally got my quarter dollar ring to come out. I would give myself an A minus becuase it is still slightly crooked. I looked at that website with coin rings. Good luck with your ring.
Permalink
I would love to see it. Got a picture?
Permalink
Everyone keeps telling me I am going to regret smashing up silver coins
How do you all feel about this?
Permalink
Well, there other things in life these people should regret. If they went to McDonalds or other fastfood joint and shoved a greasy hamburger down thier necks they should regret that and stop worrying about you smashing coins. You can buy a pre-1964 quarter for about 3.00 (90%) silver, you can then smash it up, create a nice one of a kind silver ring that will surely grab attention. You can give them as gifts that last forever. People that say say you will regret or crtisize you simply have no vision.
Permalink
My opinion on regretting “smashing up silver coins” is: I would rather have a cool looking real silver piece of Americana on my finger and/or give it away as a gift than know my coins are sitting in a drawer doing nothing.
I realize that many coins are valuable but I’m not a coin collector so the coins aren’t of any value to me other than making something nice from them.
I don’t believe my Ben Franklin half dollar is worth much and my 1945 ‘Walking Liberty’ might be worth a little but I haven’t done any research on that yet. Both coins were given to me long ago.
Permalink
http://www.tradeshop.com/temp23/mcandrew-masters.jpg
Check out these rings. They aren’t coin rings but they are really nice.
Permalink
Check these out.
http://www.auctiva.com/stores/viewstore2.aspx?id=681393&styleid=66
Permalink
Great looking rings oneringtorulethemall and sandra!
Permalink
I have been working on my Ben Franklin ring and it’s coming along great. It’s going to be a wide band for me because my fingers are thin. I’m considering ordering one of those Celtic rings from Tradeshop.com
My family are Irish on both sides and I have never seen such beautiful Celtic designs and I thought I had seen them all!!!
I’ll see if I can post a pic of my ring here when I’m done with it. Can photos be posted here?
Permalink
Any kind of machine that could be made/modified to work as a rapid hammering device? I work all the time and I’d like to make several of these for family members and don’t have much time to spoon them really.
Permalink
Keven,
There is a guy who makes these rings by hand and sells them on Ebay. I forget what his name is but just type in Coin Rings and see what comes up.
Permalink
Question for oneringtorulethemall,
I’m desparately trying to understand the specifics of forming a coin ring with the date, etc. written on the OUTSIDE surface of the ring.
When you say: “You simply bore a hole in the middle of coin and force the hollow coin over a mandrel”… are you saying to bore a hole the size of your finger??…or a smaller hole to be made larger later??
Permalink
Going thru my moms jewelry I just inherited and found a half dollar coin ring from 1945…what’s it worth?
Permalink
There is another site that sells neat rings http://www.libertycoinrings.com I dont know to make them but they look like great unique gifts. Im going to try and make one first.
Permalink
I actually made my hubby a 2-bit wedding ring back in 1979 using the spoon method. I was a bartender then and one of my regular customers was a jeweler. He actually punched out the center and polished it for me. The only bad thing about it is that it does tarnish. It’s a good idea to put a coat or two of clear nail polish on it to keep it from tarnishing too quickly.
Permalink
Sounds like a great ring Sue. Any pictures of the masterpiece?
Permalink
I really need to know how to turn the coin rings inside out. I went to that site
http://www.libertycoinrings.com/id17.html and they are charging 35.00 and up to purchase quarter
rings made out of state quarters. I have already made a silver quarter ring with a spoon so I
understand the basics of making a ring.
Also, what kind of materials would I need to push the inside out?
Permalink
Hi webmaster!
Permalink
Buy at http://www.libertycoinrings.com
Permalink
I have been wearing a quarter ring for 23 years it was my engagement ring. The quater used was the year of my birth it is all silver I have never had any problem with tarnishing. My husband loves to tell people that he only spent a quarter for my engagement ring and when I show it they are amazed. He did it with a spoon and spent about 3weeks making it. It all depends how much free time you have.
Permalink
I am going to try to make one of these soon, how do you make it a specific size?
Permalink
Tanya,
Just keep tapping until the size in the center is the desired size.
Bore out the center when you have decided it is big enough.
Keep in mind the longer you continue to tap the smaller the ring size will
be. I made the mistake of just eyeballing the size and now it only fits my pinky!
Good luck!
Mia
Permalink
Interesting facts.I have bookmarked this site. stephanazs
Permalink
well i made one of these for my gf… i used a 16oz ball peen and needless to say i hit it a bit to hard and ended up tweaking the ring so instead of fighting it and trying to get it back to straight i just went with it and it turned out pretty nice (which only took me about 30 min worth of pounding)… she wore it for one day and already got alot of compliments on it i left it pretty rough on the surface all i did was get some tooth paste and a dremel buffing disk and it cleaned it up and polished it up a little bit i plan on making another one for me now
Permalink
I made one of these with a hammer before with moderate success.
Can someone please clarify if the only way to get an image on the outside of the ring is to slowly tap with a spoon (or similar approach) and probably use a real silver coin since the metal is softer? Would pounding with a hammer be too aggressive to make one like that?
Permalink
Forget about using a spoon, it takes too long. I used a small craft/hobby hammer. I placed a piece of leather on a thick piece of metal and tapped the coin’s edges as evenly as I could. Continuous and even tapping will flatten out the edges of the coin making the ‘ring’ larger and larger. This is where sizing gets a little tricky. You will just have to judge how large you want the coin ring to be. I used an old Ben Franklin silver half dollar and found that the ‘ring’ is too large for my fingers. In the process of constant tapping with one hand and turning the coin in the other hand, I developed arthritis between my thumb and forefinger on my left hand. The arthritis apparently was already there from years of working as an artist but holding and turning the coin inflamed the arthritis.
Guess I should have purchased an already made coin ring on Ebay. Who knew???
Permalink
I am on cheap ring #3. So far I have tried both methods mentioned above. The mandrel method holds the most promise for me and is in my opinion easy enough to manage. I drilled the hole first and only about half the size of the final rings size. I then attached a cheapy automotive (deep) socket of the same size as the coin to the coin with tape. After a few tries at centering on the mandrel and about 26 swings (2 1/2 lb milling hammer) the coin had treversed the now urned. I then removed the tape, reversed the now funnel shaped coin (re–taped) and finished the sizing on the mandrel. Then I tapped the edges of the coin smooth (holding ring/coin at about a 45 degree angle). I lost some of the design on the inside of the band and some outside from errant hammer blows, but it was a great experiment. All polishing will be done with bench grinder and polishing bonnet. Good Luck everyone.
Permalink
i think i’ve read all the posts. i remember doing this…one time…back in the 70’s…guess what, i am jewellery maker at this point of my life.
let me try and help explain what’s happening.
spoon/hammer method[[coin details on the inside of the band].this method compresses and spreads the metal down and outward. the attention the maker focuses on being vertical, parallel and true, the better the result. also as has been mentioned, time and patience make a good ring. use a permanent marker and place a witness mark on both sides, this will help you in being consistent with turning the work piece as you hammer. also,reverse the coin, meaning if the head is pointed towards your navel and you make a complete revolution[by your witness mark] turn it so tails points to your navel and hammer a revolution in that direction.
think symmetry….
the design on the outside edge, i believe is being done by a machine, but imagine a flat washer. then imagine the inside edge being stretched so that it eventually becomes parallel with the outside edge[and the outside edge is being compressed for symmetry] and that’s how that process is done. i couldn’t see that one being done with metal on metal hammering.
if there is a way for you to anneal your work piece, that will soften it a bit, to aide in its movement.
there are some expensive and not so expensive tools that could make this a lot easier to do, but to spend a couple C notes to make one ring might not be very economical…
ring sizing…use a 1/4 strip of heavier paper and wrap it around the finger. mark where the edge over laps. tape the paper ring to itself so you can use it as a rough template of the size hole you need to drill/pierce. you could use a fine tip permanent marker and draw the inside circle onto the coin, giving you an idea of how much metal needs removing. it will also help in centering the inside circle to the coin.
hope this helps!!!
cheers,
richard
Permalink
I am working on my first one now, with a jewelers anvil and jeweler’s hammer. I really want to make one with the words on the outside. I am not fully understanding the post using the mandrel method. PLEASE if anyone can help me with this. I have spent hours and hours on the net and can only find places to buy them. I sure would appreciate it. Thanks, Kim
Permalink
I made one for my wife out of a mercury dime. (at 19 she had little hands) I used a tea spoon in my right hand and thumb and index finger in the other to hold the mercury dime (it hurt, can’t lie there,). It took many days, maybe a couple of weeks. after roughly sizing it I drilled the inside with a xmas tree bit, placed the ring onto a large, long drill bit (3/8 or so) and continued to tap the ring and with each tap the ring ‘spun’ as I whacked it again. Kinda gave the ring a faceted appearance. To us, the mistique of the letters of “in god we trust” and the date inside the ring gave it a special place.
But nobody on these threads has mentioned what I learned about the history of these rings.
An old Vet, my Grandpaw, told me that a lot of G.I.’s would make these to send home to thier Honeys. For this I wanted to make one and did. Anyone ever hear about what ol’ Grandpaw told me? Curoius……
Permalink
OH, just looked at ebay, I bet this guys coins are made using a heated press or the like. Silver has a low melting point, The ‘outside of the ring is to one side, and the largest part of the ring (laterally imagine sliding a flat washer made of clay from the inside ring away from the outside). It is not hammered, but stretched. The lettering is also morphed if you look closely. Whether this be the way or not, the seller is on to some cool looking rings and deserves what he has been able to create. I would buy one, because they are brilliant, in form.
However I image his process is learned fromm a great degree of trial and error, and he chose one of the most beautiful coin faces out there, as a collector my opinion.
Permalink
Guys Guys….
It Goes like this…..with no hammers,no mandrels,dies,heating,specialty press,brazing,extruding,rolling,wax mold, And yes…they are real coins.
http://s228.photobucket.com/albums/ee269/mrcoinring/?action=view¤t=1912barberhalf-1.jpg
mr.coinring@yahoo.com
Half dollar rings sizes 8.5–12.5
Barber half ——-1892-1916 $40.00
Walking liberty—-1916-1947 $35.00
Franklin half——1948-1963 $33.00
Kennedy half——-1964 $31.00
Quarter dollar ring sizes 4.5–8.25
Barber quarter——–1892-1916 $30.00
Liberty quarter——-1917-1931 $28.00–30.00
Washington quarter—-1932-1964 $25.00
Permalink
mr. coinring…how about explaining how you are doing this with “no hammers, no mandrels, etc”
Permalink
Family secret :^(
Sorry but if I were to do that my grandfather would roll in his grave..lol
Permalink
Interesting article. Were did you got all the information from… 🙂
Permalink
Check these out http://www.libertycoinrings.com
Permalink
I can’t see how those rings are hand made. The ones with writing on both sides. Anyone have any luck on making one yet and will share how. I make them the old fashion way.
Permalink
Permalink
If you wrap a nut driver or somthing simmilar in tape, the force the ring over so it grips, then place it in a drill .It will act like a lathe and you can spin and sand it or polishing, much more fast and better way of making the whole pollished effect
Permalink
mr. coinring posted:
“It Goes like this…..with no hammers,no mandrels,…etc”
honestly, nice try…unless you’re one of those “psychic spoon benders”…the ‘real coins’ have to be touched by some sort of mandrel/hammer, etc…something…if properly annealed, the metal will fold over/lay down, in almost any direction you want.
Permalink
Really? Are you calling me a liar?
Oh yea….no annealing, and again…..they Are real coins.
It is not my fault you cannot conceive how I do this.
Please check out my ebay auctions under mr.coinring. Also read my feedback and see what others think :^)
http://shop.ebay.com/mr.coinring/m.html?_nkw=&_armrs=1&_from=&_ipg=
Permalink
I got some rings at http://www.libertycoinrings.com, the guy makes custom rings and will cut you a deal if you you ask.
Permalink
Sure…If you like fake simulated toning and all.
I hand pick my coins for original patina that cannot be reproduced.
Plus its a lot more difficult to make the ring with the original toning still intact then it is to just add a fake toning when its complete :^)
Permalink
am i calling you a liar?…did i yell, “you lie”?
there’s no way you can make what you make without mandrels, drills,a lathe, etc.
you did say what you didn’t use and left out what you do use.
nah, i’m not calling you a liar.
oxidation/patina can be reproduced…really really.
Permalink
I dont know what you are talking about with fake toning. The ring I gotlook good with original patina.
And you are an ASS mrcoinring
Permalink
“caveat emptor”
here’s an interesting read, be careful what ay buy, folks:
http://coins.about.com/od/worldcoins/ig/Chinese-Counterfeiting-Ring/
Permalink
and here are pictures of the so called “”mysterious method of making coin rings””
http://www.spiritualflyer.com/Sales.html
pretty much how i outlined it, in one of my earliest posts.
enjoy!!
Permalink
Hi richardsan,
Thanks for the counterfeiting link! That was an interesting read.
Permalink
Honestly…Say what you want, but you look like a childish fool with every post.
I must say though…I do use a drill and if you recall, it wasn’t on the list of things I do not use.
If you would just think outside the box for a moment you will realize that there is more than one way.
I have designed and implemented my own tools to make this possible with thousands of very satisfied customers throughout the decades.
Chinese Counterfeit?? Whatever helps you sleep at night!
Caveat emptor? At least your Latin is up to date..lol
For anyone who doubts the coins I use and knows anything about them please look at whats in question and you will know.
http://cgi.ebay.com/ws/eBayISAPI.dll?ViewItem&item=320411733128&ssPageName=STRK:MESOX:IT
Mr.Richardsan since you know so much, where are all of these great rings you are making?
Permalink
honestly, i don’t spam forums with shameless plugs.
the warning about chinese fake coins was something relative to the discussion, at least one person found it interesting…job done.
i wasn’t slagging on you.
i just got a quarter mostly finished, took about 20 min. it doesn’t look much different than one of those in the link i posted.
i’ll post a pic, soon, with the ring[sitting in a pickle pot just now] and the plug of the eagle i popped out of the centre with my disk cutter.
no one’s criticising your work process[except your unwillingness to share] and [imho] if you’ve ‘had thousands of satisfied customers’, more the reason perhaps TO share..
i helped by finding and posting the info people come here to get,
not continuous links furnished by retailers.
Permalink
another childish post from me…; ^)
down and dirty. taking a little more time would produce a much nicer piece…
http://s628.photobucket.com/albums/uu7/grfxelf/?action=view¤t=DSCN0371.jpg
still spam free
Permalink
You really don’t need the pickle pot folks…just take your time and it will turn out better in the end.
Either way you make your rings when cutting the whole in the center I would suggest using a rotabroach set as the disc cutter is….how can I politely put this…primitive?
Just find the exact center of the coin with a good set of calipers, drill a #30 pilot hole and use the rotabroach for a clean cut without marring up that expensive 100 plus year old coin!
Hope this helps :^)
Permalink
a “primitive” disk cutter equates to:
zero particulates in the breathable air around you.
zero eye irritants.
zero consumer electricity used.
an even, near perfect, round circle with just a few hammer strikes.
Permalink
Richardsan….I know what they are, I have used them.
Where do you get dust particles from?
Would you be dumping the shavings into your eyes?
Do you never use electricity?
As you should know…The smaller you make the hole the wider the ring. Thus showing much more of the detail on the coin. The rotabroach kit comes with many sizes for you to use and “does” leave you with a Perfect hole that is perfectly centered on the coin…..no guess work as to whether or not it will be centered.
When making these rings do not cheat yourself by resorting to hammer methods to cut a hole just to make it faster.
This is typical of the “knock a hole in it and hammer it down a mandrel” method.
If you want a skinny unsymmetrical ring…by all means.
You wanted input as to how I make them and you cant comprehend the first step?
Have you ever wondered why your rings are typically smoothed down, warped, lop sided, or beveled?
People are looking to make a nice presentable ring period.
Primitive disc cutter equates to:
Not the right size hole!
Marring of the coin!
Off centered hole!
For god sakes man…Put down the darn hammer! We are not chiseling out a wheel made from limestone here.
The rotabroach is so easy a caveman can do it….and it WILL be perfect. Especially when dealing with coins that have a NATURAL AGED toning/patina to accent the detail.
But then again…what do I know ; ^)
Permalink
your poor old relative must be spinning in his grave with all your revelations.
you didn’t want to help anyone by responding to the inquiries of HOW to do it, but mostly posted spammy links to sell.
and now you’re getting a pissy tone because someone posted a method that works, thereby nullifying the “mystery” you tried to hoard.
we see you, buddy.
Permalink
LOL….richardsan still thinks I make these rings the same way he does..lol
I had one post offering my services, and I am not your buddy!
My proses is lightyears different than yours…Dont hate me for it :^)
I personally haven’t a care in the world that you post how to make rings the old time way. I simply make quality coinrings with a proses that was developed over a very long period of time.
Permalink
Richardsan
Thank you for your post and pictures of how to make a ring. I have made one with just a spoon and I can’t wait to use your method. I like the “old time way.”
Permalink
watching this coinring debate has been great! the two of ya goin at it like a school yard crush. I personally have one of mr.coinring,rings. I love it and wouldn’t take it off for anything. the detail on this ring is perfect! all art work is still in perfect condition. Has original ware from circulation. Now Richardsan, keep making the rings your way and see what that gets ya. Maybe you can use that hammered out, jagged edge, hunk of metal and use it for a napkin holder, cuz i don’t think anyone would put on there finger!
Permalink
Will someone please clean up all of the mr.coinrng spam?
Permalink
why is that spam?
Permalink
thought they were just discussing how coinrings were made and the different ways to go about it and the different results they produce
Permalink
richardsen! just has a problem understanding that someone else can come up with a process better then his. Thats a lil close minded
Permalink
thanks everyone for the post. I have most of the tools already to use. Just need a nylon hammer yet. I would have tried those ways earlier. But I made work bench and have been making rings the primative way for now for people who want them. Just been busy. Thinking about making a coffee table next. These are just hobbies for me and if I can make extra $ why not. Anyone ever try a real gold coin. I wonder how that metal is to work with..
Permalink
Gold coins work like butter…problem is that the gold coins large enough make a ring from are BIG bucks :^(
Permalink
What about using the gold coins that are sold in sets at the bank for about 18.95. Could one use one of those?
Permalink
You can but its a clad coin thats just plated with gold. After cutting the hole in the middle it will expose the the non gold on one rim..
The best way to get a gold coinring all the way around would be to make a ring of your choice and have it gold plated after its complete.
I have had customers require a copper clad coin and have it plated with platinum, gold etc.
Permalink
interesting. Plated. Do you do the plating yourself or send it out? Mr. Coinring the rings I make are the old fashion way. I do several different finishes on them. But the silver is soft. Shows scratches over time. Is there a way to harding the surface like maybe with heat or an inexpensive way?? The rings you make keep the hard coin surface and handles everyday wear better.
Permalink
I do not do any plating myself and the customers who had it done sent it out themselves.
Low carbon steel can be case hardened, but I doubt you can apply it to silver…maybe looking up silver case hardening may yield some results, other than that I dunno.
Maybe richardsan can shed a little light on the subject since he does the whole pickle pot/annealing thing.
Permalink
hi Mia!
i can only take credit for the one picture posted from photobucket. the first link i posted was the work of someone more than willing to show others how to make the coin ring, the way that they do.
thanks for your kind words.
annealing and work hardening…real metal smiths know these terms.
“annealing”:
it’s a slow heating process, to a certain degree that causes the crystalline structure to reorganize after being worked.
“work hardened”[which is the term used by most metal smiths to describe metal that has had the crystalline structure disorganized by hammering, stretching , LATHE WORK, etc.]
neither of these have anything to do with a pickle pot, which is a chemical mechanism used to remove fire scale and other surface impurities that can be caused by annealing or soldering/welding/fusing, etc. i’m a jeweler, it’s what i use, and been part of my “PROCESS” since the early 70’s.
Permalink
Ok…so what would you recommend spartussnoozer do for his rings? You know the terms, now how would you apply it and which one should he do?
I wouldn’t know since I am such a novice and apparently do not have this problem with my “Process” ;^)
Sorry for the typo richardsan, we all cant be a great as you!
Permalink
Mr. Coinring
I am sensing a negative tone. Can’t we all just get along?
Permalink
just so everyone is on the same page. I’ve been making them like the pics at the top of the page. I use a spoon finsh and buff it. That one holds up the best. I use a scotchbright pad for a dull look. It shows scratches real easy. Or I sand it with fine paper and buff it, but it scratches easy too. I need to make it harder, like the ones you guys make so this doesn’t happen. I guess I do “the workhardened” method now with the hammer or spoon. So it looks like I need to try the “annealing” way. I don’t have a melting pot or anything other than maybe fire to use and get over 600°. Would I cool it with water then or let it cool on its own. Would the fire discolor the ring. And if I polish it afterward would I end back up at step 1 again. With a weak surface that scratches. Thank you everyone.. I do like the rings you make with the writing on both sides. I own one. Think it might be from Mr.coinring. Not sure..
Permalink
Hello Mia
Nah…no negative tone.
I simply made it obvious that I do not claim to be a real metal smith or “white smith”. That is why I politely asked him to chime in. Oh, and I don’t have a problem with the old time ways of making coin rings…I never did.
So…
I guess what richardsan is tying to say is the ring has already been work hardened and now it needs to be annealed? and no..I do not use a lathe as he has capitalized above.
Permalink
You know spartussnoozer…I am interested to know as well, as my rings when complete have the exact same structure as when they were a coin. Sure they may not be as hard in nature as other metals, and may with heavy use in time develop nicks an scratches…If there is any way to harden coin silver to where it will in no way effect any of the coin rings beauty, I am all ears.
Permalink
hey spartussnoozer!
the 90% pure silver and 10% alloys for [most common] coin metal, are what were derived, to have a silver content high enough for intrinsic value versus a metal capable of being cold stamped into coinage; wear and tear inclusive. plating with a more durable metal will help, but may never give a completely scratch proof surface for a jewelry piece like a ring…but there is a point where one must decide between making something from ‘something’, versus making a new thing to achieve something else[ultra-wearable like titanium].
yes, spoon hammering is a work hardening process. folding the coin 90° on its interior axis also work hardens it. but that surface in itself, may never really be hard enough for a non-scratch surface.
annealing should be used, if you need to soften the metal, to continue working on it. a melting pot isn’t part of the lexicon of annealing. annealing on small articles is possible with a torch, but the colour of the metal is what’s more important. that first red, held for a few minutes is what re-aligns the crystalline structures, and softens the work piece. a small kiln is often used in production settings to strictly control temperatures for various processes.
here are some technical posts about this subject:
http://www.ganoksin.com/orchid/archive/200909/msg00971.htm
one can also work harden with heat…it’s a matter of knowing your temperatures, and quenching or not quenching.
Permalink
Basically its a real pain in the rear, involves buying a kiln , realigning the molecules by means of one heat temp, then only to heat it again at that magic second temp.
Would this be a room temp cool down or will he be quenching? If quenching is involved, will he use water or oil?
Think maybe it should just be left alone. Any of these things may compromise the rings appearance.
Maybe you can make the ring, do this process to the ring, and then come back again using scotchbrite or re sanding and polishing.
90% of my rings start and end with a genuine toning thats as old as the coin itself, and you wont find me throwing them in a kiln or taking a torch to them…yikes!
Permalink
Wham! Wham! Wham! goes the rotabroach…lol
http://i228.photobucket.com/albums/ee269/mrcoinring/PA067206.jpg
Serously folks….get a rotabroach set ;^)
http://www.google.com/products?hl=en&source=hp&q=rotabroach&um=1&ie=UTF-8&sa=N&tab=wf
Permalink
Wham! Wham! Wham! goes the rotabroach…lol
http://i228.photobucket.com/albums/ee269/mrcoinring/PA067206.jpg
Seriously folks….get a rotabroach set ;^)
http://www.google.com/products?hl=en&source=hp&q=rotabroach&um=1&ie=UTF-8&sa=N&tab=wf
Permalink
This site has been very helpful to me in learning more about making rings from coins. I started with a quarter, making a ring for my daughter. To save time, I used a hammer, and was able to periodically re-true it by putting it between steel washers in a vise. Whether with a spoon or a hammer, this “old fashioned” method can preserve the ring design on the inside edges if carefully done, and of course, the exterior can be highly polished. I was intrigued to see variants where the design was prominent on the outside, and began searching the ‘net to find out how that was done. Obviously, some are mass produced and show “stretching.” There are many ways to approach this type of work. Thanks to both mrcoinring and richardsan for their perspectives. It’s interesting to learn how things are done, and having come up with my own ways of accomplishing things, I’d like to thank both for their insights.
Permalink
Thank you Mr. Coinring. I bought a rotabroach set shortly after reading your post. They are great and drill a perfect circle. I still do the rings the old fashion way, hammer and spoon. I sold over 50 of them just from people I meet. I’m not gonna worry about the scratches that come from wear.
Thank you richardsan. If I ever come across a nice size anvil I will use annealing and work hardening process to make swords or knives.
I just had a chance to try and make rings the kind you guys make. The first one was with a half penny (copper). I was off center a little and the shape is off. It is also cone shaped a little. The inside is worn from the hammering (steel mandrel). And the outside coin edge is thicker than the inside. I used fishing line to find the center. Made a x with it.lol My craftsman hammer took a beaten from it. I will try a couple more times with junk metal coins before using silver. By the way the coin prices are going up. What ever happened to the 31 to 1 silver and gold ratio. I wonder if gold will come down or if silver will climb to get there again. Its gonna be hard to sell silver rings if the prices keep going up.
I just tried making 2 rings
Permalink
I am making a ring out of a silver 1952 50 cent piece for my grand daughter for Christmas, I have a friend that owns a metal fabrication shop and he will cut the ring hole with a laser machine..
I tried to make a ring with a 1901 silver dollar, I had my friend put the hole in the dollar first off center so the top of the ring would be wider than the sides and bottom, but it wound up splitting the coin in the bottom where the hole was drilled closer. It was really hard to tap on the coil with the hope already there. I learned something though and am sure glad I have time to make that present.
Permalink
Here is a gold coin ring made from a -looks like a 10 dollar gold piece. Very nice. Put this link in your address bar and you can see it.
http://cgi.ebay.com/ws/eBayISAPI.dll?ViewItem&item=300376677235&ssPageName=STRK:MESELX:IT
Permalink
Found this… may be of help to those wanting to make a double-sided coin ring.
http://www.instructables.com/id/Turn-a-Quarter-into-a-Ring/
Permalink
Mr. Coinring you say not to torch the coins because of the discoloring of the coin. Are you use some kink of strecher that pulls the inside out or use some type of electric heat to make the coin softer? Hmm. I still do it the old fashion way(kind of). But with a hammer. Made over 100 of them so far. Right now some one wants a half dollar coin to become a size 5 ring. That sounds fun. Also made 2 dollar size rings. One was a size 12.5 and the other a size 14. I sell all my coinrings locally and to people I meet. And I don’t have a problem with them bending. Did run into two coins with an air pocket in them. Had to cut it out and will sell them as toe rings.lol
Permalink
I do not heat up my coin/rings at all. I typically do not make half dollars below a size 8 or 9 as they start to get very bulky on a smaller finger, and not very comfortable. Same goes for the silver 1 dollars.
The only thing I use the silver dollars for is napkin rings ;^)
Breakage does happen….really cant avoid it as some coins just refuse to submit lol.
Permalink
how about the coin ring man? is he a crook too?