
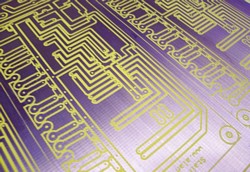
| This article goes through the steps required to photo etch your own copper clad circuit boards. There is a relatively small amount of hardware that is required and the steps are quite simple. If you have done the toner transfer method in the past why not move to the next level? |
If you are thinking of making your own circuit boards there are a few option: * The easiest is to design the board and send the file to a facility that will produce the board for you. * The toner transfer method is popular when you need to make one or two boards. * If you have a CNC machine you can route it. * You can photo etch the board.
Click on the steps below to see how it is done.
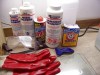 |
1) What you need (page 2) |
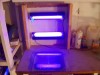 |
2) Expose (page 3) |
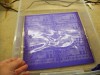 |
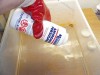
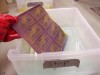
3) Develop (page 4) |
 |
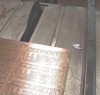
4) Etch (page 5) |
 |
5) Remove Resist (page 6) |
 |
6) Cut out panels (page 7) |
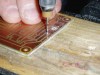 |
7) Drill (page 8 ) |
Permalink
Any recommendations on where to acquire the boards and etchants? The only place I’ve found with decent prices is (http://www.elexp.com/pro-pcb.htm).
Permalink
Forgot to mention that this was a great article.
Permalink
Have to congratulate you on another great article alan! Was just what i was looking for, as per the previous comment, do you know of any decent suppliers?
Permalink
Very awesome article, thanks!
Permalink
Some hints that make this process even easier:
a) Leave as much copper as possible in the blank spaces of your PCB designs so there’s not as much surface area to etch. The etching process won’t take as long this way!
b) I’ve had great results by exposing boards with regular fluro lights held a few inches above the glass. You could probably even use sunlight, as I’ve found it many, many times more effective than special uv bulbs when exposing things like silkscreening frames.
c) Float your tray of ferric chloride in a tray of warm water and agitate the etchant with a popsicle stick…the board will etch faster. You can reuse ferric chloride too.
d) Forget Draino! Nail polish remover on a cotton makeup pad works too, and is less dangerous to work with.
e) Cutting fibreglass can expose your lungs to crappy dust. Wear a mask!
Permalink
Rad Guy – to add more specifics…
A.) If you use Eagle Cad – you can do a copper pour – basicallt draw a polygon around the board and connect it to ground on the PCB designer. Of course there might be some space that might not get filled in and you can do that by hand on the PCB software.
B.) I’ve never used UV (black light) bulbs and just used the drafter bulbs – has a bit of a blue tint.
C.) I use a verticle setup so I can use a bubbler to agitate the solution.
D.) Never heard of that one before – but will try it next time I do a board!
C.) Don’t go cheap on the boards – Fiberglass vs. that other crap.. Fiberglass boards or more expensive – but well worth it if you have to cut.
Permalink
Hi BronzeG3,
Thanks, I got the boards from Far Circuits
http://www.farcircuits.net/
as far as the etchant goes that is just picked up locally as Active Electronics
http://www.active-tech.ca/b2c/redirect.cfm?pn=2
Permalink
Thanks Hack247 and Lucas. Hack247 see the above comment for details.
Permalink
Hi Rad Guy and Ellis,
Great comments. I know what you mean about being dusty when cutting the panels…
I will have to look into those fluro bulbs, how much quicker are they?
I also prefer fiberglass boards, those brown ones seem so brittle.
Permalink
Thanks Alan, i’m going to try and source the equivalent component locally here in the UK – I’ll post them up once I have them all together so anyone else in the UK can have a go
Permalink
when you’re done etching your board and want to make it more resistant to the environment, moisture, high voltage isolation etc., consider applying a special electronics coating such as that found here:
http://www.web-tronics.com/electronic-chemicals-protective-coatings.html
good luck!
SLentions
Permalink
Советую Вам Ñкачать Ñтот текÑÑ‚ из Ñамиздата:
хокку – хайку: трехÑÑ‚Ð¸ÑˆÐ¸Ñ Ñразу на руÑÑком Ñзыке
http://zhurnal.lib.ru/l/lobkow_a_b/hokkutxt.shtml
Удачи вÑем Вам в Ñети!
Сергей
Permalink
SLentions: Epoxy will help that if you are worried about enviro problem. Will be better than the spray – just dip the board once you are done soldering. If you have heat sinks on the board – you will want watch out for that..
Of course you can put the circut in a mineral oil bath!
Permalink
Sir,
Thank you very much for your suggestions on “Photoetching”.
I was looking for something like this for the past 2 days. Thank you once again.
I have one question for you. Is is possible to use a simple copper clad board and then coat it
with a photoresist material, instead of using a readymade photoresist board?
Sir, please give me a response as soon as possible.
Arun.R,
Research Fellow, India
Permalink
@Arun.R from what I have heard – the diy photoresist isn’t all that great to use since you have to apply it by hand and it’s uneven with the coating. Get the pre-done stuff. Or just use the laser transfer method if you are not looking to do anthing with a super fine dpi (pitch for SMD stuff)
Of course, I’m looking at the Sears CNC machine to see if it cut it (pun intended) for quicker PCB that don’t have to use chemicals. I would post a link – but it looks like Sears got rid of it with in the past couple days. I don’t know why. They fly off the shelf like free cookies!
Permalink
I would agree with Ellis that coating your own boards can be hard, I have read about many issues with consistency. I have never tried it myself though…
Permalink
Who can help me with .httpaccess ?
where i can fined full information about .httpaccess file syntaxis?
Permalink
Off subject there – but google .htaccess
not .httpaccess
Permalink
Permalink
Nice Site!!! (p)D
Permalink
Great article, thank you! Do you think this technique for this sheets of stainless steel? I need to make intricate gas flow fields for hydrogen fuel cell experimentation. The etched areas, would need to be 1-2mm deep. Here is a link of a commercially made product that gives you an idea of what I’m looking to do.
http://www.tech-etch.com/photoetch/images/fuelcells.jpg
Thanks, Rich
Permalink
Hi Richard,
I would think the principal would work however you would have to find a liquid that would etch the stainless steel before the resists broke down.
Permalink
Hmm – 1 – 2 milimeters? You could machine it..
Permalink
Dear Alan Parekh,
I do not know what “The photo sensitive circuit boards” is ?
Could you please explain more? Thank you very much.
Bests,
Permalink
Hi ChuongNT,
A photo sensitive circuit board is a normal copper clad board that is coated with a resist (material that prevents etching). This resist is exposed to light to harden it, the non exposed resist is washed away to expose the copper. The board is then etched as usual.
Permalink
How much cool water do you use when diluting the Liquid Drano?
I got a board from Far Circuits and no instructions.
Sodium bicarbonate (baking soda)is used for the developer and
Liquid Drano for striping.Thanks
Permalink
I used the granulated Drano but the liquid type will probably work. I didn’t measure how much water I used. I would think it was about 2 liters though.
Permalink
Too much Drano in too little water can case a big problem. Also try to stay away from the stuff with the metal shavings it.
Permalink
Great article. You may also be able to use an eprom eraser for exposing the boards. I’ve got one, and as long as the board to be exposed isn’t too big, it should work (I’ve yet to try it, but need to do some boards in the next week or so). If it’s powerful enough to erase a chip, it should do just fine on exposing a board. I’ll post another reply when I found out how it works out.
Permalink
Hello. Very interesting website. Keep up the outstanding work and thank you.
I’ll be back.
Permalink
It sounds very easy to start up but never tried it. Are the materials expensive and could you give me some sites or addresses for the chemicals and boards. Fascinated by the scanner conversion, as they always say neccessity is the mother of invention. Can this be done at home ie in the kitchen and what do you do with the waste.
Permalink
Radio Shack may still carry the etching solution, which might run you $6-$10 on a small bottle. I bought a big bottle (1 gallon) for like $19 at Fry’s Electronics. You can also get the powder which you would have to mix on your own. So I would Google Ferric Chloride and see what prices you come up with.
For the boards Google Pre-Sensitized PCB.
Permalink
Hi Sean,
For Ferric Chloride disposal have a look at this site:
http://www.mgchemicals.com/techsupport/ferric_faq.html
“The solution must not be put down the drain because of residual copper ions left in it. To make it safe for disposal, you can add sodium carbonate (washing soda) or sodium hydroxide to it to neutralize it, until the pH value goes up to between 7.0 and 8.0, testing it with indicator paper. Copper will be deposited as a sludge. Allow the sludge to settle, pour off the liquid, further dilute it with water and then it can be poured down the drain. Collect the sludge in plastic bags and dispose of it as required by your local waste authority.”
Permalink
Permalink
Hey, this article has been great for me. i use photo etching to etch silver before they are made into rings. if anyone’s looking for the photosensitive photopolymer film (the plastic stuff that coats the copper and acts as a resist) i bought mine (uk only i think) at sallydyas.com she does massive roles of the stuff, quite cheap, tho remember you need to do it in the dark or under a red light.
this might not be suitable for you guys and your circuit boards but thought you might like to know!!
P.s. does anyone know of a decent brand of transparencys that i can use my laser printer on…my current stuff from WHSmith(uk shop) seems to be kinda sticky and it picks up dust that i can’t get off. Any suggestions would be much appreciated.
Jen
Permalink
Hi Jen,
Thanks for the info. The transparencies that we use seem to work very well. They are the Staples brand but I am not sure they are available there.
Permalink
hi thish is ajit i am form india i want pcb making software
Permalink
I’m planning on doing some circuit boards in the new year and am collecting the supplies. Is there a specific ‘dark room’ light source that is safe to use with the boards?
Thanks and exellent website
Billy
Permalink
Hi Billy,
The standard red light that is used in a dark room is fine.
Permalink
Permalink
The most difficult part when I used to do this was cutting the boards. Didn’t have access to a table saw, it looks alot easier than using a jig!
Permalink
This post is really awesome. Being an engineering student i liked the way it has been taught here to buld a circuit board of your own. I am surely gonna try this new method in my lab.
Permalink
i want to make PCB circuits
Permalink
Permalink
Hi,
I’m an artist and would like to find out how I can etch photos onto steel in my studio. What equipment and chemicals do I need to get started, can I buy all from you and how much cost such a set up?
Your help is greatly appreciated,
Sincerely,
Marianne Reim
Canada
Permalink
Permalink
you can buy photoresist from Idea factory Equipments (P) Ltd,
Sample pack of 100 gms avialble for 400 rs including shipping cost all over India
for further question please ask me directly at wa@ideafactory.co.in
Regards
Ajay
Permalink
Cool! Always love trying something new, I’m gonna have to try this out tomorrowThanks!Mandy