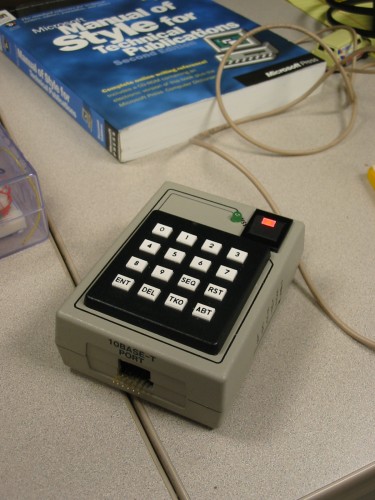
This project may not be needed for your everyday life but it turns a PIC Microcontroller into a DTMF Phone Dialer and there is code provided so next time you need to make some DTMF magic you can use this project as a starting point.
" The dialer is operated this way:
- Storing a number. The device can store up to 12 numbers, identified by a bank ID. The ID is one of the buttons 0-9, SEQ, or RST. To store a number, press ENT, followed by the bank ID button. After pressing the bank ID, the green LED will light up, showing you that the device is expecting the number. Enter the number sequence (up to 15 digits); the SEQ button corresponds to the *-key on a phone; the RST number is #. You can use the DEL or TKO buttons to insert a pause. When you finish press ENT to store the number, or ABT to discard the changes and leave the old number stored in this bank unchanged. The green LED will turn off at this point. Example: To store the number 555-1234 in bank 0, press ENT-0-5-5-5-1-2-3-4-ENT.
- Dialing a stored number. Just press one of the 12 bank ID keys (0-9, SEQ, or RST). If there is a number stored in that bank the device will dial the number, otherwise nothing will happen. Example: To dial the 555-1234 stored number (see "Storing number" above) simply press the 0 button.
- Copying a stored number from one bank to another. Moving stored numbers around is a useful feature that I have not seen in any off-the-shelf dialer. To copy a number, first press ABT. The LED will light prompting you for source bank ID. Press the source bank button. The LED will remain on, waiting for a target bank ID. Press the target bank button. The number stored in the source bank will be copied to the target bank. You could cancel the operation at any time by pressing ABT. Example: To copy the 555-1234 number stored in bank 0 to bank 3, press ABT-0-3. After this, pressing the 3 button will dial 555-1234.
- Manually dialing a number. Press the DEL button. The LED will turn on. Now you can use the keypad to dial any number. The SEQ button corresponds to the *-key on a phone; the RST number is #. To exit manual dial mode, press the DEL button again (pressing ENT, TKO, or ABT button will exit manual dial mode too). The LED will turn off at this point. Example: To manually dial 555-9999 press DEL-5-5-5-9-9-9-9-DEL.
- Changing the dial speed. The maximum reliable dial speed depends on the system that you are dialing into and the noise on the line. To change the dial speed press TKO. The green LED will light up, indicating that the dialer is waiting for you to select dial speed. Press a number button between 0 and 7. The new dial speed will be set, 0 being the lowest speed, and 7 – the highest. The green LED will turn off after the speed is selected. Example: To switch to the highest dialing speed press TKO-7."
Via: Hacked Gadgets Forum


Permalink
Great project, but what about the dtmf decoder 🙂 I would be interested in that one.
Permalink
Microchip has application notes on their website for DTMF stuff:
* AN655 DTMF Generation using PWM or R-2R ladders
* AN257 DTMF Detection Using PIC18 Microcontrollers
Permalink
Posted this link in http://www.surfurls.com
Permalink
Permalink
Dear Mr Parekh i’m very pleased with the product alarm phone dialer and as you’ve said i would like to built
it at home but i couldn’t locate the source code on any of the links. so if possible do send me the
source code at the above address.
Permalink
I’d also like the source code for this app note.
Permalink
As I said before, the app notes and source code can be found on the Microchip website. Here are the links:
AN655 (DTMF generation):
http://www.microchip.com/stellent/idcplg?IdcService=SS_GET_PAGE&nodeId=1824&appnote=en011071
AN257 (DTMF detection):
http://www.microchip.com/stellent/idcplg?IdcService=SS_GET_PAGE&nodeId=1824&appnote=en024294
If the links don’t work for you, try going to the Microchip homepage (www.microchip.com) and put the App Note number into the site search box.
Permalink
lwr20,
There’s a zip file containing an executable at that link. When you execute its contents, it installs
all the documentation except the PIC source code(as far as I can see). I searched the Microchip site,
including the ‘downloads’section, and wasn’t able to find the source. Specifically, I’m looking for the detection code.
Permalink
Ooops! I found it. You have to find the installation folder, and there’s another folder inside it with all the sources.
Thanks for the help
Joe
Permalink
JoeR – no worries. I look forward to seeing what you make with it posted on this site 🙂