

|
We had 34 fantastic entries for the Workbench Contest. These entries have been viewed more than 11000 times so far! They will continue to provide inspiration for years to come when people are looking for bench ideas. It was very hard to come up with a winner for this contest since there were so many great entries, many of them describing fantastic layouts and equipment ideas. It was nice to see that so much could be achieved in small places. Have a look at the winning entry below. |
Workbench:
=========
The actual workbench frame is made from an old computer desktop I found in the trash.
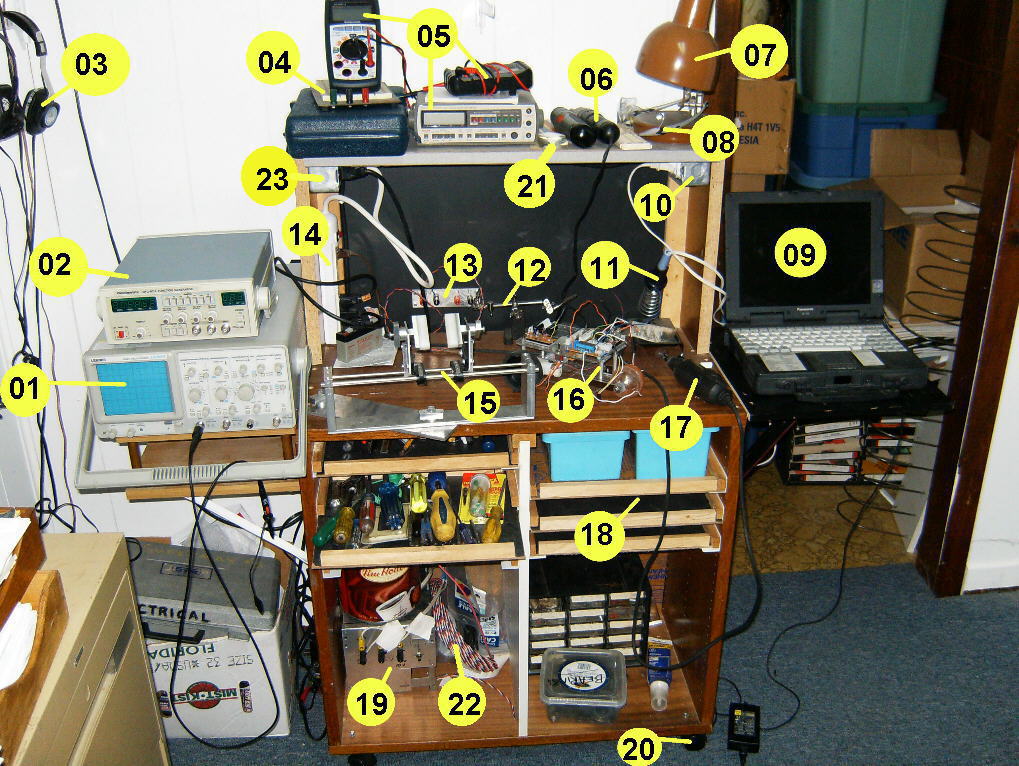
Just before submitting this entry, I bought some 2nd-hand lab equipment (#’s 01 and 02):
– (01) oscilloscope (on a shelf made of an old stand for a tractor feed printer). Great for tracing electronic signals. The tool par excellence for electronics. One suggestion for getting an oscilloscope or other equipment – check to see if there is a Freecycle site in your city (I got the impression that there is one in every major city in North America – at any rate there is one in Montreal). Freecycle is a sort of club (the Montreal one was on Yahoo) where everything is given or offered for free. . And ASK for one. It worked for me. I never thought anyone would give away one but a really nice lady gave me a single trace oscilloscope (not the one you see in the photo). After using it for a while and realising it is a top class tool for electronics, I looked around for a slightly more modern dual trace one. My conscience would not allow me to sell the first one (I got it for free), so I gave it to one of my friends.
– (02) Function Generator (good for injecting test signals).
– (03) Stereo amp (on shelf up near the ceiling) & headphones (for music while you work)
– (04) experimenter’s board
– (05) various multimeters. A multimeter does not have to be expensive – I bought one at Canadian Tire for $29.99 and it included (besides the normal AC and DC voltage, resistance and amperage measurements) a frequency counter, a square wave test signal output and a capacitance measuring function.
– (06) an old Black & Decker cordless screwdriver with a cord to replace the non-functioning batteries – no batteries to recharge or wear out and lots of torque (powered @ 5v from the PC power supply – see #19, below). I don’t need batteries – I’m using it at my workbench after all!
– (07) Flood light (I prefer incandescent lighting instead of fluorescent).
– (08) Safety Glasses (I tell my students : ‘Just because you have two eyes, it doesn’t mean you have one to spare!’)
– (09) I recycled my old Panasonic laptop for use on my workbench
– List of useful software :
– Waveform generator output by headphone socket
(pros : cheap (free!), cons : limited in bandwidth to audio frequencies)
( http://www.esseraudio.com/TTG_Setup_en.exe ) or
( http://heliso.tripod.com/download/generator/dsg.htm )
– Calculator for resistors for LED’s (see appendix for Internet resources)
– Ohm’s Law (use Excel or the equivalent from Open Office)
– Music .mp3 (play the .MP3 output from your computer through your stereo – #3, above)
– (10) – separate electrical box with a separate switch for the soldering iron
– (11) – soldering iron station (I need to get one that has a variable temperature controller)
– (12) – "spare hand"
– (13) – output sockets for 5V and 12v from converted PC power supply (see #19, below)
– (14) – power bar (you never have enough power bars!)
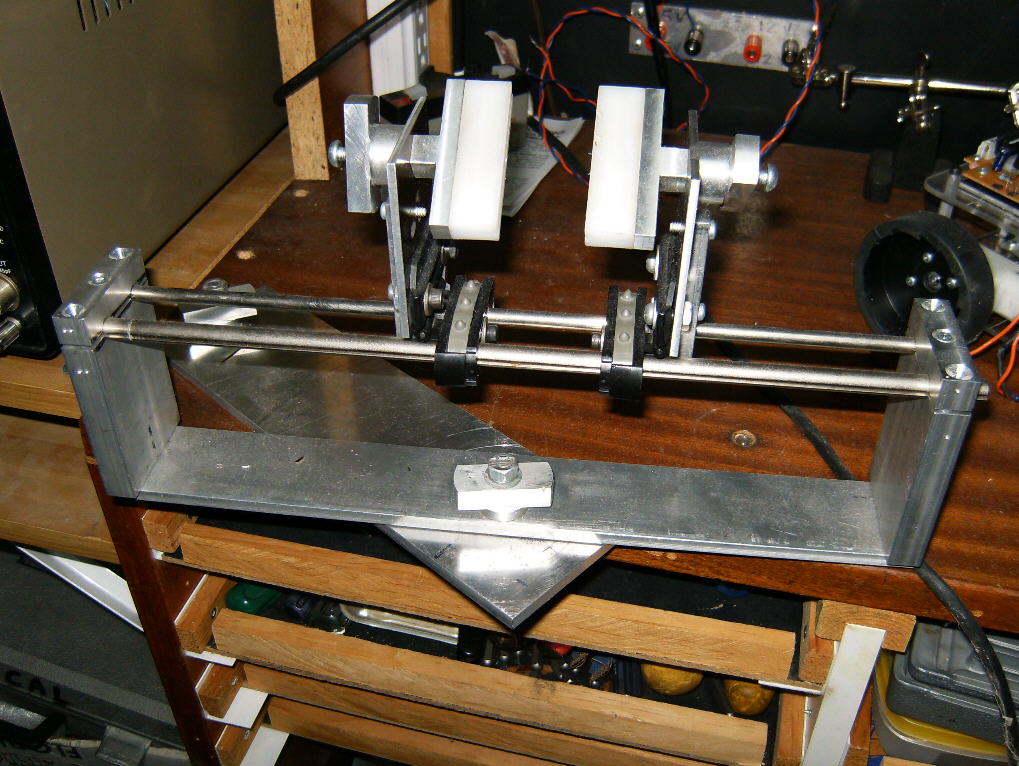
– (15) – PCB holder made from an old printer tractor feed mechanism – recognise the parts ? (can open to about 8 inches and can flip over PCB and lock in any position – see separate photo)
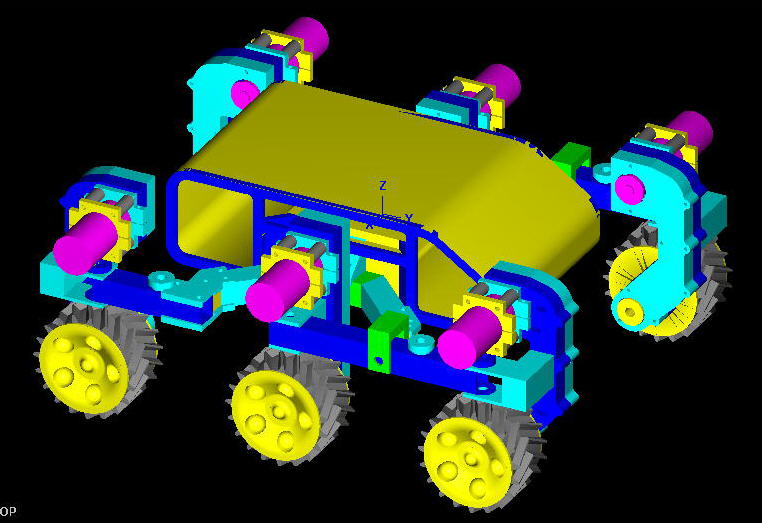
– (16) – current robot project – all ready to be wired up (my 2nd robot – see photo).

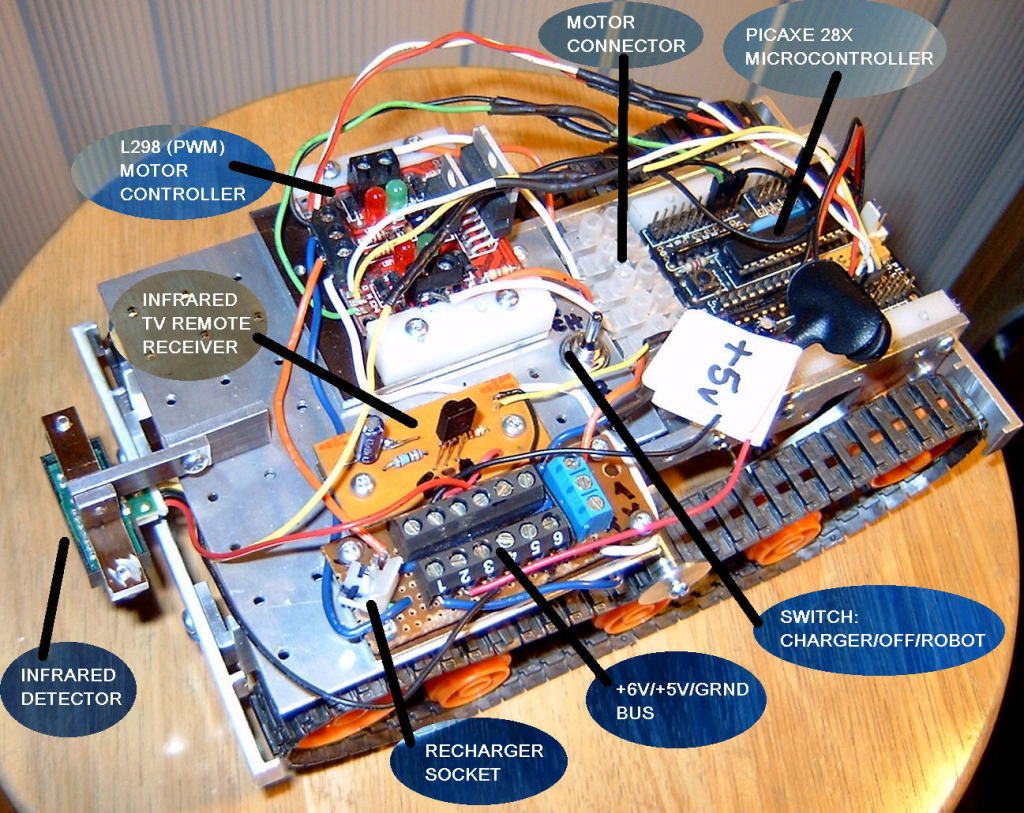
I am experimenting with infrared detectors (3 in front and 1 in back for obstacle avoidance and 1 in each corner pointing down for edge-of-table detection). I use the Picaxe microcontrollers (the 28X) (see reference at the end). I am also have made the design for a 6 wheeled robot.
My first robot :
– (17) – Dremel tool.
– (18) – shelf slides made from old plastic suspended ceiling angle and 1/4 in. hardboard
– (19) – a power supply made from a PC power supply – I literally hacked the case down in size to the minimum possible – just enough to hold the electronics (look for how to use a PC power supply on the Internet – see references at the end).
– (20) – the workbench is mounted on castors from an old office chair (so I can move the workbench around)
– (21) – Magnifiers : (1) head mounted loupe (not shown), (2) hand rectangular magnifier, (3) #3 eyeglasses (not shown). See also photo of stereo microscope.
– (22) – wiring for projects
– (23) – Main switch, so you can turn everything off in one shot (don’t want to leave that soldering iron on , do you?)
Tools for Electronics Workbench:
===============================
– It isn’t worth scrimping here – you’re better to buy a good quality tool than have to re-buy a new one after it breaks in your hand. Pliers, screwdrivers, misc. hand tools, tools for de-soldering, mats and bracelets for eliminating static charge when working on electronics parts that are sensitive to static. etc
Microscope Photo:
===============
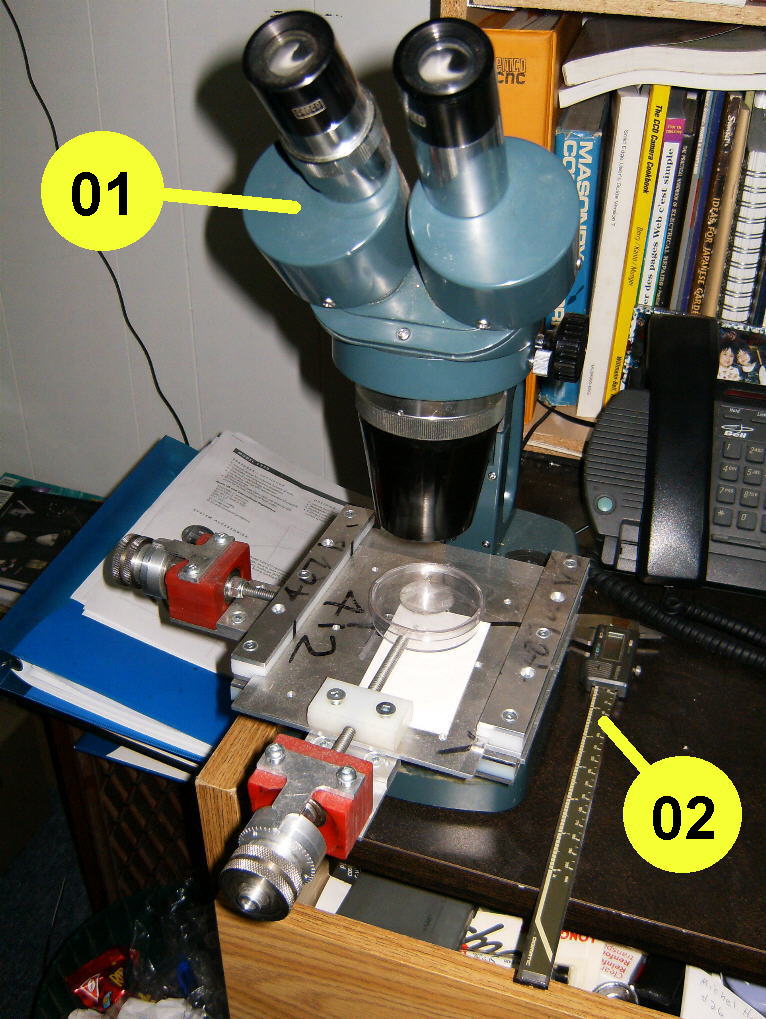
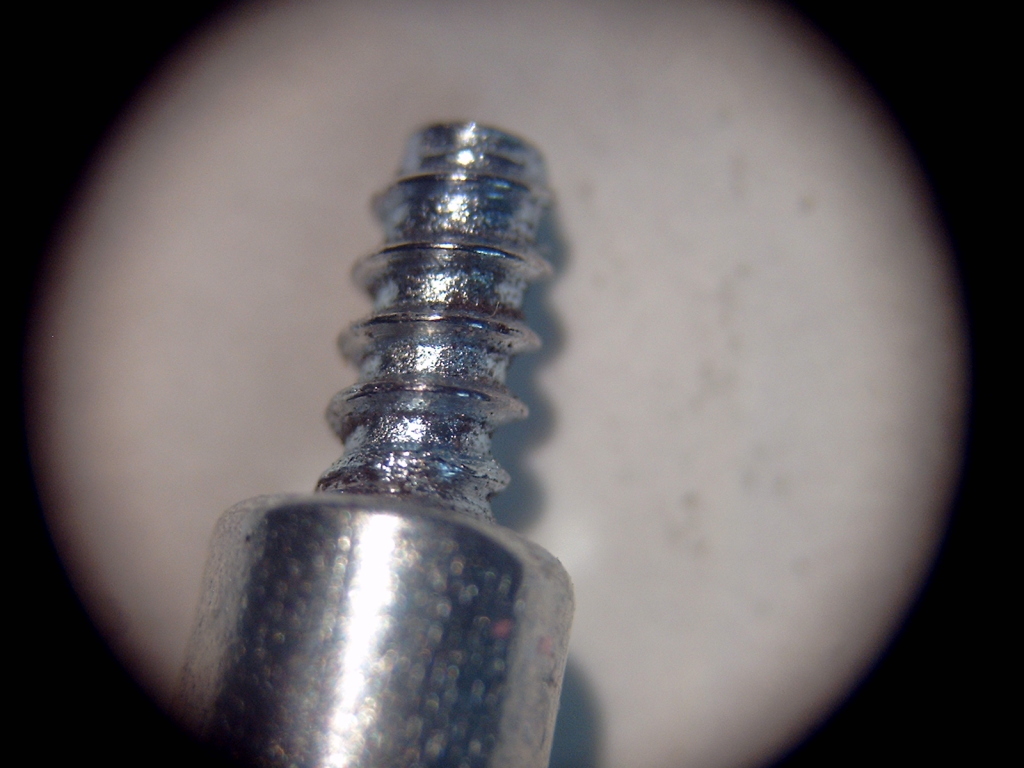
– (01) – stereo microscope for inspection (with X-Y slide). I designed the X-Y stage with a ¼-20 threaded rod (i.e. with a pitch of .050 in.) and graduated the dials with 50 divisions so that I can use the microscope for measuring. There is little or no play in the X-Y stage because the nut that moves it back and forth is made out of nylon. I would also eventually like to use the microscope for perhaps soldering small SMD chips. I also designed and made a digital camera adapter so I can take pictures through the microscope (not shown – see photo of tiny screw)
– (02) – digital calipers – very very useful for measuring
Also great to have around :
=====================
– a digital camera – great for taking pictures of what it looked like BEFORE you took it apart! I also use it when working on my car. Also great for taking a photo of something you need and then going to the store and you then show the salesperson a photo of what you need instead of trying to describe it.
– old office chair with castors so you can be comfortable while you work
– resistor chart
– better laptop : with access to internet for searching for info
– favourite sites (see Annexe -A-), favourite magazines etc.
Photo of shelves:
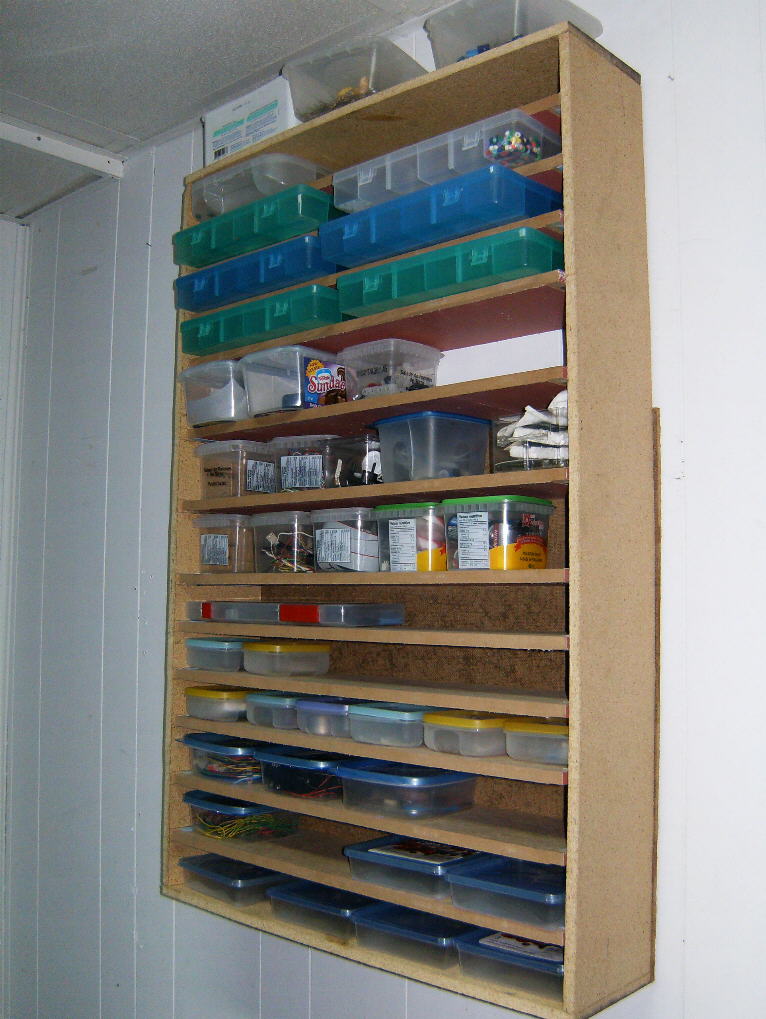
– Shelves for parts – made of 1/2 in. particle board that the school was throwing out with 1/2 in. aluminum ‘U’ channel (also thrown out) screwed into both sides so I can adjust the distances between each shelf. The containers are from the Dollar store (3 for a buck) but I always ask my wife for the transparent potato salad containers (about 4 x 4 x 4). Other storage needed : for binders, magazines, internet research (make a filing system so you can find everything)
Other parts of my Workshop:
==========================
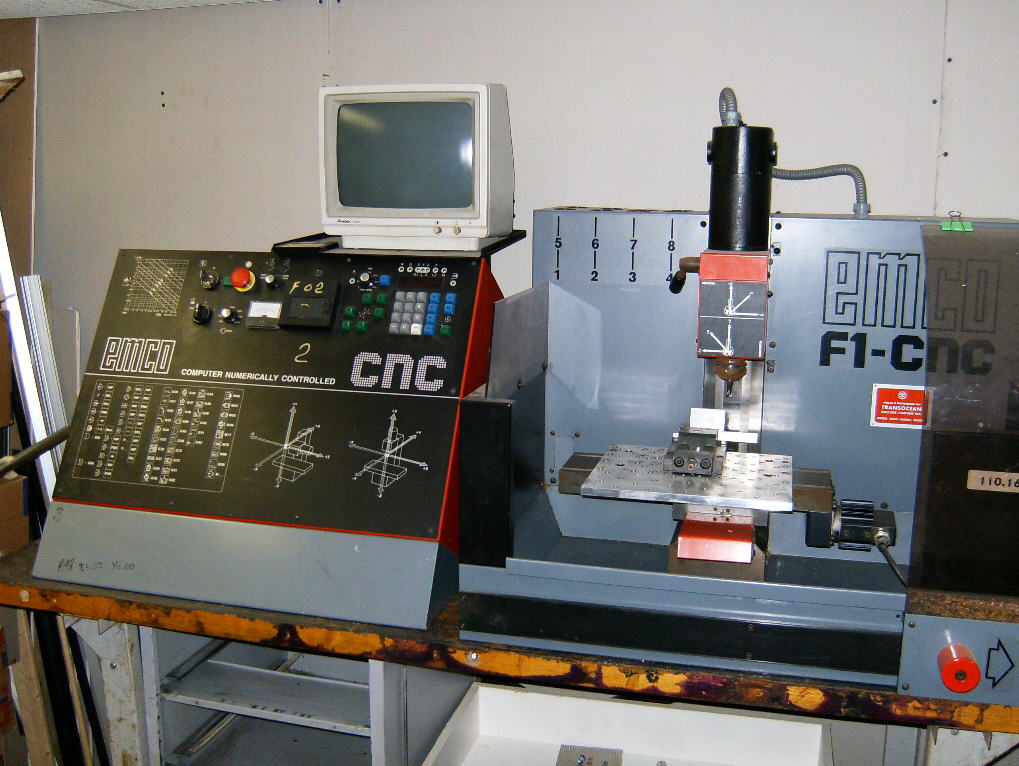
– Emco F1. This is a miniature CNC (Computer Numerical Control) machine (X travel 8 in, Y travel 4 in., Z travel 8in.). I eventually want to machine PCB’s with it [see separate photo: ]
– Drill press (with shelves and tooling);

To make the drill press easier to use: First make sure the table of the drill press is square to the spindle by putting a cylindrical metal rod (say, 3/8 in. in dia.) in the drill chuck and then use a try square and adjust the angle of the table until it’s square with the rod. Then, drill and ream a small hole (say, ¼ in.) underneath the table, through the flange supporting the table and into the body of the drill press. Then, any time you use the drill press to drill holes at any other angle than perpendicular, all you have to do is insert the dowel pin in the hole you drilled and reamed and the table will be square again. [see separate photo: ]. See Annexe –B- for suggestions that I sent to Nuts and Volts magazine regarding tapping threads (hope this will be useful to someone).
Annexe -A- (Internet resources)
==========
Free or shareware CAD (great for drawing sketches or even doing life-size printouts for transferring lettering to fronts of projects)
– I use Eagle for my PCB designing
– DeltaCAD – one of the only two shareware programs I have ever bought, I use it all the time
Picaxe microprocessors: Great microprocessors for both the beginner and even the more advanced. Free programming interface (in BASIC), about $10 for the 28X, $20 for the board (no programmer to buy), great support and excellent users forum.
www.rev-ed.co.uk/picaxe/
U.S. Picaxe dealer:
http://www.hvwtech.com/
Click on : ‘View all pricing in Canadian Currency’ if you want Canadian pricing. They have a Picaxe dealer in Alberta for Canadians.
Making a power supply from a PC power supply (there are lots of references on the Internet – here’s one from Instructables:
http://www.instructables.com/id/Use-that-old-PC-Power-Supply-as-a-high-current-%2b3./ )
http://led.linear1.org/led.wiz (online calculator for resistors for LED’s)
(favourite internet sites)
http://dev.hackedgadgets.com (duuuuh)
http://blog.makezine.com/
www.hackaday.com
www.instructables.com
http://dailydiy.com
www.i-hacked.com
http://www.evilmadscientist.com/index.php
http://www.hack247.co.uk/
http://zedomax.com/blog/
http://thisismyrobot.blogspot.com/
http://www.uchobby.com/index.php
http://projects.dimension-x.net/
http://digg.com/
http://todbot.com/blog/
http://www.imagesco.com/articles/articleindex.html
http://www.sci-spot.com/
http://www.diylife.com/2008/06/06/cadsoft-eagle-5-test-drive/
http://www.makingthings.com/news-items/xbee-wireless-boards-now-available/
(Scrounging parts)
http://www.uchobby.com/index.php/scrounging/
(Magazines on Robotics)
www.servomagazine.com (Servo Magazine – my all-time favourite magazine about robots). You can buy a CDROM with a whole year on it.
www.nutsvolts.com (another great magazine on robots and electronics)
(Taking things apart)
http://www.takeitapart.net/
http://www.thinkcomputers.org/forum/showthread.php?t=632 (taking apart laptops)
http://www.irisvista.com/tech/ (taking apart Toshiba laptops)
(Electronics (General))
http://www.autoshop101.com/forms/h2.pdf
http://www.discovercircuits.com/
http://www.epanorama.net/
Annexe -B- (Suggestions sent to Nuts and Volts magazine regarding tapping (threading) holes in metal that they published in their letter’s from readers)
==========
Great magazine guys. I am going to get into robotics and your magazine is fantastic!
I have some suggestions regarding the reader (Mike Montgomery) who wondered how he could remove a broken tap.
All of the 10 suggestions you gave were very good. Maybe I could add some more. I teach adults in a trade school in Anjou, Quebec (in Montreal) sometimes in the machinist course but mostly the CNC course.
Additional suggestions (to continue your list):
11) Buy and use only machine taps (not hand taps). These are sometimes named gun taps or spiral point taps. The advantage of these is that you do not have to keep backing out the tap – just keep on going (just be careful when you get to the bottom of the hole). They don’t cost much more than the hand taps and are much easier to use (for example, at KBC Tools a 3/8-16 manual tap sells for $3.60 CAN and a spiral point tap sells for $4.88 CAN).
12) Make yourself an alignment block. This can be any small piece of scrap steel (say, 3/4 in. by 1 in. by 1/2 in thick) in which you drill a series of holes that are simply slide-fit holes for all the taps you will be using (say #4 up to 3/8 in.). As an example, you could drill a 1/4 in. hole for a 1/4 in. tap, etc. Ideally, you should drill these holes on a drill press (verify that the head of the drill press is reasonably square with the table). Then, when you wish to tap a hole in a part (after you have drilled the proper sized hole – example a #7 drill for a 1/4-20 tap), just position your new alignment block over the hole to be tapped, hold it down with one hand, insert the tap in the appropriate hole and tap away. The alignment block will keep the tap at right angles to the surface being tapped (so it starts square). This works even when tapping in awkward positions like vertical or overhead. Of course, the tap-drill has to be drilled square to the surface for this to work. I made one of these alignment blocks about 20 years ago and I still have it and use it in my basement workshop.
13) Buy yourself a ratchet-action T-handle. I bought 2 sizes, a small and a big one for about $20 each. After you have used one of these, you won’t want to go back to thee old T-handle!
14) To know the right size of drill for each tap, get a Tap-drill chart (usually free). I even typed the info that is contained on a tap-drill chart into my Zire Palm, I always have the info at hand. I also compiled and entered into my Zire Palm charts for the sizes of various hardware (such as Socket-head cap screws, etc) and various handy formulas for calculating threads (if someone wants the tables for their Zire, I can send them).
15) There was an article in the Oct/Nov ,2002 issue of Machinist’s Workshop on how to make your own simple home-made EDM machine of the plunging type. When asking for a reprint
(http://www.homeshopmachinist.net/?page=main.features.articleindex&view=3&show=4050)
, make sure you ask for the update information in the December 2002/January 2003 issue of the same magazine (it’s a magazine that comes out once every 2 months) for some very important updates on safety and modifications to the original article (pages 3 and 35). Just keep it away from children. (By the way, I find their site a bit hard to navigate).
16) For lubricant, try and buy some tapping oil, sometimes you can get some for free at machine-tool shows and the like. Sometimes the places that sell tools will give you a small free sample bottle. A small bottle can last a long time, especially if you only tap once and a while. For aluminum, I usually dilute the tapping oil with Varsol. In reality, any lubricant would be better than tapping completely dry – if you have to and you’re desperate, use old motor oil.
17) Recycle! The next time you throw out a toothbrush, keep it to clean the threads of the tap.
Sometimes you can break a tap because the chips are not cleared out.
(18) Use small transparent cases for each tap size containing the tap drill, the clearance drill and the tap so you don’t have to look around each time you want to tap something.
Your readers may find some of the following formulas useful: In these formulas the following terms will be used:
Nominal Diameter (ND): this is the outside diameter of an external thread (also known as the Major Diameter),
for instance the nominal diameter of a 1/2 in. bolt is 1/2 inch (.500 in.).
Thread Pitch: (P) the distance between the crests of two consecutive threads (the distance from the crest
of one thread to the crest of the next thread), measured along the length of the thread. Most Inch
threads are written in the form of: 3/8-16 where 3/8 is the nominal diameter (outside dia.) (.375 in.),
followed by the pitch, expressed as Threads Per Inch (TPI). In this case of 3/8-16, there are 16 threads
per inch, therefore 1 inch divided by 16 threads results in a distance between 2 consecutive thread
crests of 1/16 = .0625 in. To use another example, a 3/4-10 thread has a pitch of 10 threads per inch =
1/10 = .100 in.
Minor Diameter (MD): the diameter that is at the root (bottom) of the threads.
Thread Depth (TD): the distance from the outside of a thread to the bottom of a thread (a radius
distance)(useful for machining threads on a lathe)
Pitch Diameter (PD): the diameter that lies equidistant between the Nominal Diameter and the Minor
Diameter (this is easier to show with a diagram, which I can send you if you want it ).
Note: all the following examples will use the threads of 5/16-18, for which ND = .3125 in. and the Pitch (P)
= 1/18 = .0555 in.
Formula: Thread Depth (TD): TD = .6495 * P
Example: .6495 * .0555 = .0360 in.
Note 1![]() .6495 is a constant)
.6495 is a constant)
Note 2: this value is a radius value and is useful for machining threads on a lathe
Formula: Pitch Diameter (PD): PD = ND – (.6495 * P)
Example: .3125 – (.6495 * .0555) = .2764 in
Note: this value can be found in the Machineries Handbook and is the value meaured by a thread micrometer.
Formula for calculating the diameter of the tap drill (if you don’t have a tap drill chart):
ND – P
Example: .3125 – .0555 = .257 = drill F
Minor Diameter (MD): MD = ND – (1.0825 * P)
Example: .3125 – (1.0825 * .0555) = .252
Additional formulas:
===================
Nominal Diameter (outside diameter) of numbered screws :
Example: # 10 screw
Nbr. of screw * .013 + .060 (note: both .013 and .060 are constants)
= 10 * .013 + .060 = .190
Example: # 6 screw
Nbr. of screw * .013 + .060
= 6 * .013 + .060 = .138
I hope this information is of use to somebody.
If you find this information useful and you want the same information on metric threads, just ask. Some of
the formulas are the same. Regards, Lorne Wilkins
Permalink
Congrats Lorne!
nice Entry… You have some nice stuff in that workshop. I absolutely love the homebrew PCB clamps. Nice.
Just out of interest, in the picture with the Emco CNC you have a large metal toolbox. I inherited one of these a few years ago and it has no label. I would love to know who made it.
Permalink
Congrats to the winner, and a big thanks to everyone who participated. I’ve got so many ideas now. You all did a wonderful job sharing. Thanks!
Permalink
Permalink
Well done, sir. Very impressive. Do you have to manually program the Emco CNC? Can you use a 3D CAM package and upload programs?
Permalink
Only one word ….. WOW!!!!!
Congratulations!
Permalink
Thanks everyone for your nice comments and your congratulations. I never thought I was going to win – there were a lot of workbenches that were better equipped than mine.
To reply to a few questions:
1) ”Just out of interest, in the picture with the Emco CNC you have a large metal toolbox. I inherited one of these a few years ago and it has no label. I would love to know who made it.” I think you mean the toolbox next to my drill press. It is a Craftsman double tool box that I bought about 30 years ago when I was a machinist.
2)”Do you have to manually program the Emco CNC? Can you use a 3D CAM package and upload programs?” For now I have to program it manually, using the tape cassette. I am trying to debug the RS232 interface. I think there is a chip that is not working. Eventually I hope to be able to program it with MasterCAM via my laptop. I eventually would like to replace the original motors and control with something better and stronger. There is a Yahoo group for the small Emco milling and lathe.
I know that the persons who visit this site love hi-tech stuff. Therefore, I would like to say a word to the parents. As parents we all want to have the best for or kids and maybe we would like them to all turn out to be doctors and lawyers. However we know that the vast majority of kids will not end up being doctors or lawyers. Kids who have trouble with academics (they have a hard time finishing high school) might make great machinists or other trades persons – maybe they would like to have a job making things, especially if they are the manual type who like to make things with their hands. I always tell my students: “The best job is the one where you get paid to do what you have fun doing or are passionate about”.
Our governments and the media have told us that a crisis is coming (in my opinion it is already here). When all the Babyboomers like me retire in 5 to 10 years there will be no one to take our place. This applies to all the trades, not just machinists. Every time I visit my students while they are doing their stage, the people in the machine shop are always asking me for students. One wall of my CNC shop in our school is covered with requests for machinists.
I am a teacher who teaches CNC machinists to adults in Montreal (in French). Teaching is with out any doubt the best job I have ever had. With what the Quebec government includes in the CNC program, my students can go directly out and get a job. Almost 1/2 of the students in my last class got a job where they did their stage. It’s a real cool feeling knowing your students are going to put food on their table for their wife and kids with what you’ve taught them.
Not only is teaching a satisfying job in itself, I get to play with 12 CNC machines – like playing with 12 robots(including 2 Mazaks) and make all kinds of projects. I tell everyone that it’s like PAYING a teenager to play Nintendo.
The moral of all this ranting : try and convince your nephews and nieces (yes, women can be great machinists too) to take a course in some trade or other. While you’re at it, take a course yourself in a trade, especially if you get laid off.
Permalink
I have to say any gadget which is hacked and in anyway made better i have to say it wins any contest!